Roof leaks are a big problem in any weather, but a roofing system that starts to leak during a severe rain storm can soon turn into a major emergency. Extreme stormy weather can leave you with an exposed roof and a major issue on your hands. A roof leak is most likely to show its ugly head during a heavy rain storm, especially when there are strong winds. Unfortunately, this is also when roofing contractors get swamped with phone calls from panicked home owners.
Whether triggered by hail storm, wind or rainfall, roof leaks need to be managed as soon as possible to limit water damage and preserve the integrity of your home.
First Things First
The first thing you should do if you spot a leak from an exposed roof covering after a significant storm is contain the leakage from the within so you can reduce interior damage. If your roofing has actually been damaged to the point where shingles and flashing around chimneys and other areas are missing or damaged, or if there’s an opening in the roofing outdoor decking, there’s bound to be an active water leak inside your home. You will need to go up into your attic, locate the water penetration source and do what you can to limit the spread of water by placing buckets or other large containers being certain to check them often and empty them when needed.
If you have time in advance, move any materials or furniture in the area that could be damaged by moisture. You may also want to put down drop cloths, garbage bags or tarps on the floor to make sure that carpeting and flooring stay dry.
 Usually, a roof leak will form a tiny pool in the ceiling till it finds a way to escape. This will typically be something like a light in the ceiling, a heating register or just beneath a joist. Ceiling corners are also other spots where leaks will certainly often occur. In some cases they find outlets in numerous places but the original leak is from one source, making it look even worse than it usually is. If the ceiling is holding water or you see a lump in the drywall, jab a screw driver or other sharp object into the opening in order to drain the puddling water into a bucket that you will have placed beneath it. This will help minimize the damages to the ceiling and force the water to exit from a single location.
To accumulate the water, you can always make use of pails or large cooking pots, however the most effective concept is to utilize a garbage container that you use for your waste disposal company pickup. These containers are huge and usually have wheels, making them simpler to relocate even if they are full of water.
Since it would exceptionally unsafe to go up on your roof during a storm, containing the leak from inside you house ought to be your key objective.
What To Do Following The Storm
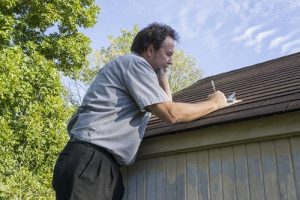
Only after the leak is controlled from inside and the rain has stopped and the storm has passed should you deal with stopping the leak at its source. Your very first and best move should be to call an expert roofing contractor to assess the damage and take care of the leak. If that is not possible and you have to take action to temporarily stop a leak from an exposed roof then safety should be your number one concern.
Here’s What You Can Do Temporarily
Walk the perimeter of your home to check for any type of indication of roof damage, including shingles that might have blown off or that look loose or broken, as well as any kind of displaced flashing around your chimney or damages to the chimney itself. If you find the leak in the roof from the outside you can make use of a tarp to temporarily secure it while you wait for roofing experts to make the final repair. Keep in mind that this is only an emergency procedure developed to limit roofing damage from fast-approaching storms when a roofer isn’t available to make the long-term repairs in time.
Safety On The Roof
Before going up on to your roof you should make a trip to a local rental store to rent a safety harness and roping so that you can work safely. Most rental places can instruct you how to use the equipment to best ensure your safety when working on your roof. There are also some helpful videos online if you search for roofing safety harnesses and equipment use.
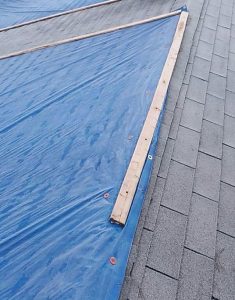
You will need a heavy duty woven plastic tarpaulin that is large enough to cover the location of exposed or damaged roof plus an extra 3 to 4 feet on each side. You will also need numerous two-by-fours and screws long enough to go through the 2 X 4 plus an extra inch so they can penetrate into the roofing system to firmly connect the tarpaulin.
How To Secure The Tarp On Your Roof
Roll the end of the tarp around a two-by-four and then screw it firmly to the wood. Affix the two by four to the top of the roofing system over the damaged portion. Roll the remainder of the tarpaulin over the exposed roof leak area until it gets to a couple of feet past the damaged area. Roll the end around another two-by-four, then screw the wood two-by-four into position on the roof, roll-side down. If needed, utilize extra two-by-fours to secure the sides of the tarp.
Now it’s time to get back on the phone and make sure your roofing contractor prioritizes you and gets the repair done promptly and correctly.

 The importance of a home inspection should not be underestimated. It’s a must-do that can help homeowners save money now and in the future. However, many buyers are so blinded by the excitement of buying a home that they gloss over problem areas. If there are issues with a home, regardless of its size, the buyer should hire a roofer for a complete examination and estimate for roof repair
 Usually, a roof leak will form a tiny pool in the ceiling till it finds a way to escape. This will typically be something like a light in the ceiling, a heating register or just beneath a joist. Ceiling corners are also other spots where leaks will certainly often occur. In some cases they find outlets in numerous places but the original leak is from one source, making it look even worse than it usually is. If the ceiling is holding water or you see a lump in the drywall, jab a screw driver or other sharp object into the opening in order to drain the puddling water into a bucket that you will have placed beneath it. This will help minimize the damages to the ceiling and force the water to exit from a single location.