Warning Signs That Indicate You May Need A New Roof

Roofing_Worker

Is it time to repair or replace your old roofing? Look out for these warning signals so that you know when it’s time to call a roofing contractor.

Many property owners figure they require a brand-new roofing system after they find even a small leak in their ceiling. This leakage could be as a result of various roof covering problems. But what factors truly identify whether roof repair work will resolve the trouble, or your house needs a roof replacement?

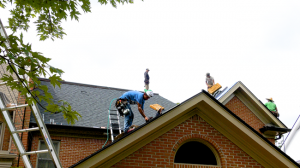
It’s important to remember to get quotes from at least 3 pros! You should always look for a roofer who has good reviews and some manufacturers certifications like this company in Lancaster Pa.  You can see their GAF Certification right on their website like this lancaster pa roofing company: https://lancasterroofingmasters.com/

Below are some suggestions to help you figure out if you need a new roof.

  1. Roofing age

Just how old is your existing asphalt shingle roof? Many specialists agree that a normal roof will certainly last between 20-25 years. You must also take into consideration on whether the old roofing system was eliminated and you only have one layer of shingles, and if it is properly aerated. If the roofing was installed over one layer or a number of layers and it is older than twenty years, chances are you require a brand-new roof covering.

  1. Shingles curling and/or visibly distorting

Roof shingles that are curled or buckling are another sign that you may need a new roof. Check out the sides of your residence that get straight sunlight and look to see if the roof shingles are crinkling or losing granules as well. It could indicate that the shingles are past their life span. It could also mean that the roof covering is defective.  In this case, contact a certified professional roofer to see if you could be eligible for reimbursement.

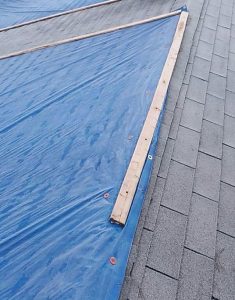
  1. Contours (valleys and peaks) in your roof

If your roofing tiles are falling apart or missing in areas, it’s a certain sign you require a brand-new roofing system. Valley locations of your roofing system can cause rain and snow to circulate through valleys and into rain gutters. If the valley is endangered, you could be prone to roofing system leakages.

  1. Missing shinglesmissing shingles on roof

These are an additional indicator your roof covering could be failing. Examine to see if all of the roof shingles “tabs” are intact.

  1. Chimney flashing issues

This is an additional area to be worried about. If your chimney has an undercoat of tar or concrete as the seal between the roof and the brick or stone and morter, it may have to be replaced replaced with a long-term, water-tight metal flashing system.

  1. Shingle granules in the gutters.

Look in your seamless gutters to see whether they are loaded up with shingle granules. Roofs often tend to lose more granules toward completion of their life process. Variation in color on some parts of the roof is another sign the granules have actually deteriorated.

  1. Daylight showing through the roofing.

If you notice a squishy feeling or trampoline bounce when walking on the roofing system, this may imply the underlying outdoor decking is compromised from wetness. Inspect your attic room to see if there is any type of daylight coming through the roofing system boards. Also check for moisture in the insulation.

How to Choose the Right Roof Covering For The Pitch Of Your Roof

Roofing_Shingles

When choosing roof shingles or tiles or metal panels for your roof it might seem that you have a boundless selection of  material on the marketplace: asphalt, composite, steel, wood shake, rubber, and MSR rolled roof coverings. Many people think that the selection is purely an aesthetic or economic one– that you select a roofing material totally according to what you like or what you can manage financially.

Not so. Lots of elements determine which roofing products you can utilize, as well as one make-or-break element, the incline of the roof, called roofing pitch. For instance, you might consider  timeless composite shingles on your roof, however if the pitch is below a particular ratio, you may be required to set up a various sort of roofing– perhaps rolled roof or standing seam-metal roof covering.

Roofing Pitch – What It Is And How It Affects The Roofing Materials You Use

Pitch is the term used to define the angle, slope, or slant of your roof. Roofing system pitch classifications consist of 2 numbers indicating a proportion. The ratio can be shown by a division lower separating the numbers, such as 2/12 or 7/12. Or, the colon can change the slash, as in 2:12 or 7:12. In any case, the notation assigns a proportion in between two measurements of the roofing system– a numerator as well as denominator.

Numerator: The numerator, or very first number, describes the vertical (height) measurement of the roofing system.

Denominator: The common denominator, or 2nd number, denotes the straight (length) measurement of the roofing system. To make things a little bit easier, for roofing purposes the common denominator is constantly 12. Even though standard math tells us that 12/12 can be decreased to 1/1, this is not done with a roof covering pitch. The denominator continues to be 12.


Exactly How to Determine The Pitch of a Roof

Simply put, the pitch of a roof is just a ratio that suggests just how much angle there is in the roof over a 12 foot  horizontal range.

Here are some examples:

5/12: For each 12 horizontal feet, the roofing system changes 5 feet in vertical height.

8/12: For every 12 straight feet, the roof adjustments 8 feet in vertical elevation.


For most home designs, roofing system pitches fall in a variety 4/12 (a moderate) slope up to 8/12 (relatively high). Instances of extreme slopes vary from 1/4/ 12 (practically flat) to 12/12 (sloping down at a best 45-degree angle).

Low and High Pitch Instances

2 examples at each end of the range:

Low-pitched: It was trendy for modern-style houses built in the 1960s to have little pitch, just a barely negligible incline to aid drain water. Visually, this roof appears flat. This pitch might be as reduced as 1/12.

High-pitched: Roofs on Victorian-era homes were typically greatly angled with a steep pitch. Think of a classic Adams Family haunted residence with its soaring peaks and you have a picture of a piercing roof covering. This is one of the rare pitches where the numerator is greater than the denominator, with an incline as high as 18/12.

.25/ 12 to 3/12 Roofing Pitches

Roofing system pitches with reduced angles, such as 1/12 up to 3/12 are located in modern style homes as well as in industrial structures. The level roofing products most appropriate for these shallow-sloped roof coverings include:

Built-up roofing: Sometimes called tar-and-gravel, or BUR, the modern kind of this sort of roofing system includes rotating layers of asphalt as well as strengthening materials.

” Torch-down” roofing: This is a single layer membrane-style roofing product that is heat-activated by a torch throughout installment.

Rubber membrane: EPDM (brief for ethylene propylene diene monomer) is a real rubber that can be applied to a roofing system with glue or mechanical supports.

Metal_Roof
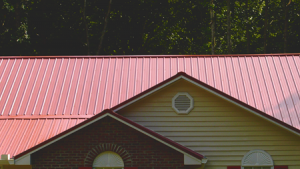
Standing seam metal: These roofs are made from panels of aluminum or steel collaborated in raised joints. They can be made use of on roofing systems with pitches as reduced as.25/ 12. They are additionally made use of on much steeper roof coverings.

2.5/ 12 to 19/12 Pitches

Clay or cement floor tiles can be made use of on a vast array of roof covering pitches. For pitches of 2.5/ 12 up to 4/12, the roof calls for double underlayment. Inclines over 19/12 are not suggested given that tiles on very steep roof coverings can rattle.

4/12 to 20/12 Pitches

A terrific amount of residential roof coverings fall into this classification. The roof products frequently utilized for these pitches consist of asphalt (compound) shingles: Conventional 3-tab shingles made with asphalt composite are the most prominent sort of roof shingles as well as are the most versatile in terms of adapting to many roof pitches. These roof shingles are appropriate for pitches as reduced as 4/12 pitch, all the way as much as a 12/12 pitch. Consider them as taking the center road in terms of roof pitch– not as  level, but also not steep.

5/12 to 12/12 Pitch

Wood as well as slate shingles are made use of in much of the same kinds of roofing as asphalt composite tiles, yet might not be appropriate for roofing systems near the lower end, considering that they are a lot more at risk to dripping. Wood and slate tiles do not secure together as tightly as other kinds of tiles.

A Quick Look At Some Roofing Materials

The majority of roof covering materials have actually an advised pitch variety for which they are most appropriate. Adhering to the suggestions is not mandatory; however you should not go below the recommendation. As an example, timber and slate tiles may work for roofing steeper than the leading suggestion of 12/12, however you ought to not install them listed below the 4/12 reduced variety.

Clay or cement floor tiles: 2.5/ 12 to 19/12

Asphalt (composite) shingles: 4/12 to 20/12

Wood and slate tiles: 5/12 to 12/12

Built-Up (BUR):.25/ 12 to 3/12

Rubber membrane:.25/ 12 to 3/12

Standing-seam steel: 1/12 to 19/12


What To Do If Your Roof Leaks During A Storm

roof ceiling stain

Roof leaks are a big problem in any weather, but a roofing system that starts to leak during a severe rain storm can soon turn into a major emergency. Extreme stormy weather can leave you with an exposed roof and a major issue on your hands. A roof leak is most likely to show its ugly head during a heavy rain storm, especially when there are strong winds. Unfortunately, this is also when roofing contractors get swamped with phone calls from panicked home owners.

Whether triggered by hail storm, wind or rainfall, roof leaks need to be managed as soon as possible to limit water damage and preserve the integrity of your home.

First Things First

The first thing you should do if you spot a leak from an exposed roof covering after a significant storm is contain the leakage from the within so you can reduce interior damage. If your roofing has actually been damaged to the point where shingles and flashing around chimneys and other areas are missing or damaged, or if there’s an opening in the roofing outdoor decking, there’s bound to be an active water leak inside your home. You will need to go up into your attic, locate the water penetration source and do what you can to limit the spread of water by placing buckets or other large containers being certain to check them often and empty them when needed.

If you have time in advance, move any materials or furniture in the area that could be damaged by moisture. You may also want to put down drop cloths, garbage bags or tarps on the floor to make sure that carpeting and flooring stay dry.

roof leak bucket
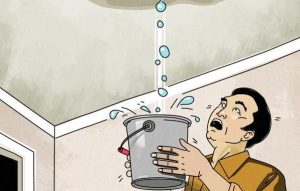
Usually, a roof leak will form a tiny pool in the ceiling till it finds a way to escape. This will typically be  something like a light in the ceiling, a heating register or just beneath a joist. Ceiling corners are also other spots where leaks will certainly often occur. In some cases they find outlets in numerous places but the original leak is from one source, making it look even worse than it usually is. If the ceiling is holding water or you see a lump in the drywall, jab a screw driver or other sharp object into the opening in order to drain the puddling water into a bucket that you will have placed beneath it.   This will help minimize the damages to the ceiling and force the water to exit from a single location.

To accumulate the water, you can always make use of pails or large cooking pots, however the most effective concept is to utilize a garbage container that you use for your waste disposal company pickup.   These containers are huge and usually have wheels, making them simpler to relocate even if they are full of water.

Since it would exceptionally unsafe to go up on your roof during a storm, containing the leak from inside you house ought to be your key objective.

What To Do Following The Storm

Only after the leak is controlled from inside and the rain has stopped and the storm has passed should you deal with stopping the leak at its source. Your very first and best move should be to call an expert roofing contractor to assess the damage and take care of the leak. If that is not possible and you have to take action to temporarily stop a leak from an exposed roof then safety should be your number one concern.

Here’s What You Can Do Temporarily

Walk the perimeter of your home to check for any type of indication of roof damage, including shingles that might have blown off or that look loose or broken, as well as any kind of displaced flashing around your chimney or damages to the chimney itself. If you find the leak in the roof from the outside you can make use of a tarp to temporarily secure it while you wait for roofing experts to make the final repair. Keep in mind that this is only an emergency procedure developed to limit roofing damage from fast-approaching storms when a roofer isn’t available to make the long-term repairs in time.

Safety On The Roof

Before going up on to your roof you should make a trip to a local rental store to rent a safety harness and roping so that you can work safely. Most rental places can instruct you how to use the equipment to best ensure your safety when working on your roof.  There are also some helpful videos online if you search for roofing safety harnesses and equipment use. Tarp on roof

You will need a heavy duty woven plastic tarpaulin that is large enough to cover the location of exposed or damaged roof plus an extra 3 to 4 feet on each side. You will also need numerous two-by-fours and screws long enough to go through the 2 X 4 plus an extra inch so they can penetrate into the roofing system to firmly connect the tarpaulin.

How To Secure The Tarp On Your Roof

Roll the end of the tarp around a two-by-four and then screw it firmly to the wood. Affix the two by four to the top of the roofing system over the damaged portion. Roll the remainder of the tarpaulin over the exposed roof leak area until it gets to a couple of feet past the damaged area.  Roll the end around another two-by-four, then screw the wood two-by-four into position on the roof, roll-side down. If needed, utilize extra two-by-fours to secure the sides of the tarp.

Now it’s time to get back on the phone and make sure your roofing contractor prioritizes you and gets the repair done promptly and correctly.

Welcome to Roofing Done Right!

roofing done right

Welcome and thank you for taking the time to visit our blog.  We have a network of roofing professionals who are willing to help you understand how your roofing system works, what you need to do to fix it and how to find the right contractor if you decide to hire one. Our focus is on helping homeowners but much of our content will benefit even the most seasoned pros as the industry continues to change and progress with new, more efficient tools and better, longer-lasting products.

Although we will concentrate on roofing, some of our contributors are experts in various home repair and construction projects. We will tap their knowledge to help you with how-to articles about everything from patching damaged drywall to fixing a leaking faucet. Please come back often as we will continue to post articles on a regular basis. Any one of them might be the solution your were looking for and it could save you thousands of dollars.